Posts Tagged ‘Features’

Email Templates – New Feature

Written by: Categories: Features
December 18th, 2013

OCC now allows you to fully customize the automated emails that are sent from the system, including:

Chat Transcripts

Chat Transcripts (that visitor sends)

Offline Messages

Missed Requests


Each can be customized per department and with different variables. All the email’s basic information can be edited including:

Message

Subject

From Email


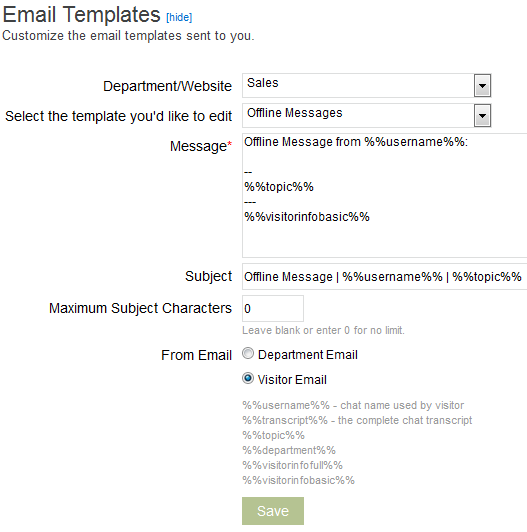
The Message and Subject fields can use the following variables, taken from the visitor’s information and the chat:

%%username%% – chat name used by visitor
%%transcript%% – the complete chat transcript
%%topic%% – topic of the chat
%%department%% – department/website associated
%%visitorinfofull%% – visitor’s full info
%%visitorinfobasic%% – visitor’s basic info (does not include location and device info)


Here’s how to use the Email Templates:

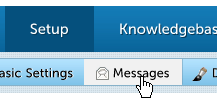
1. Login to the Account Dashboard

2. Go to Setup > Messages > Email Templates

Account Dashboard - Setup | Messages

To edit an Email Template, select the Department/Website, then the template you wish to edit.

Change the fields using the fields and insert the variables in gray font in your desired locations within the subject line and message body. The subject line can be very long depending on the variables you insert, so we give you the option to cut off the email at a certain number of characters (start at 50 characters then test with your desired email client).

You can also define if the email comes from the department email (if you entered more than 1, the first email entered is used) or the visitor’s email.


Email Templates OCC


The Email Templates feature is available to all OCC Accounts: Free, Premium and Enterprise.

Number Scrambling & Chat Transcript Export

Written by: Categories: Features,News
June 1st, 2013

Here’s a quick Sunday update post:

2 new features have been released last week that we’re officially announcing today:

Number Scrambling

For the added safety and security of your chat visitors, any numbers that could be seen as credit card numbers or social security numbers are scrambled and not stored in the chat transcripts. You’ll instead see the numbers replaced by x’s in your chat transcripts:

Number Scrambling

Number Scrambling


Chat Transcript in CSV Export

The CSV export of your chat history now can, optionally, include the entire chat’s transcript. This is also available in the scheduled email.

This option is only available for 30 day periods to minimize server load. Find the new option in your Account Dashboard under Reports > Chat History

Click Export to see the option appear.

Chat transcript export

Chat Transcript Export

Chat Transcript Export in Scheduled Email

Chat Transcript Export in Scheduled Email

Automatic Chat Invites – Triggers

Written by: Categories: Features
April 2nd, 2013

We’ve made a change to our chat invitations, previously called Timed Chat Invitations.

You can see the new and improved Automatic Chat Invites in your Account Dashboard under:

Setup > Messages > Automatic Chat Invites


Specifically, we added 2 new features to chat invites:

– Invite Types
– Pop up # Limiting


We also added a few more items to improve how this section works and to ease the process of adding an automatic chat invite to your website.

Automatic live chat invites

Automatic Chat Invites

Invite Type

The invite type drop down now offers you 2 options for the chat invite:

Direct – This will send the visitor directly to the chat queue as was the case with our timed invite prior to the update.

Chat Request Form – The chat request form type will send the visitor to the chat request form defined for the department before they are sent to the chat.


Pop Up Limiting

There is a new option to limit the maximum number the chat invite is displayed to a visitor in a single browsing session. The default setting is 0 which will show the chat invite an unlimited number of times.


Future Additions

In addition to these edits, we added the triggers area which will be expanded much more in the future to show additional features such as time on site, pages visited, visitor source, and more for our upgraded users.

Let us know what you think of the new feature and we look forward to expanding this section of OCC live chat even more!

For Account Owners: Operator Profile Setup Invites

Written by: Categories: Features
February 4th, 2013

We’ve released a new handy feature for account owners, helping their ability to setup Operators in their live chat setup.

Operator Invites

Account owners can now invite operators to create their own profiles within their OCC account through the Account Dashboard.

Here’s how to invite operators to set up profiles:

Go to Setup > Basic Settings > Operators

We’ll pretend there are no additional operators added into the account just yet. Click Add Operator and fill out the information for the operator.

After adding the operator, you’ll see a new link and icon in the Actions column, “Email Invite.”

Email Operator Invite Link

Email Invite Link

If you click the Email Invite link, a window will pop up to verify the user’s email address. Hit Send Email on that to send the email a link (valid only for 48 hours) to a page where they can customize their profile.

Operators are able to change their name, email, image, login and password. After saving their information, the operator is sent to a page that gives them their full login information and link to each of the OCC Agents, similar to this page: OCC Agents.

After the operator sets their profile up, the account owner is emailed a notification with the full details of the operator’s info for quality assurance.

Keep posted on more updates like this via our Twitter page: @OCC

Hidden Fields in Chat Request Form – New Feature

Written by: Categories: Features,News
October 15th, 2012

For the past few weeks, we’ve been testing a new feature in the OCC Chat Request Form called Hidden Fields.

Hidden Fields allow you to pass information from your web page to the chat request information area and into the chat request form itself.

Note that this is an advanced feature that will require some knowledge of web development to set up.


How Hidden Fields Work

1. Log in to your Account Dashboard

2. Go to Account > Messages > Chat Request Form

Chat Request Form


3. At this point, we’re assuming you have a form already created. If not, click Add Request Form

4. Click form fields (x) to edit the fields on the form you want to edit.

5. Click Add Form Field and select Hidden Field


6. Once you add, you will see a column ID”


7. Next you must pass data from the website into this hidden field. For this, the data must pass through the icon code.

Find in the OCC code on your website the line below. Note that the x below is your account number.

“<tr><td class=”occIcon-x“>&nbsp;</td></tr>”

Change this line to:

“<tr><td class=”occIcon-x><!– { “request”: { “ID1” : “customer information”, “ID2” : “other field” } } –></td></tr>”


In the example above:

{“”:{“”:””}} – JSON format.

ID1 – ID of first hidden field. This will be a number like 555

ID2– ID of second hidden field

and so on…


You can dynamically pass any string of info in the place of “customer information” such as a customer ID, email, or phone number. Pretty much anything that is displayed or located in your code on the web page can be passed into these fields.


For example, in PHP the hidden field can look like:

<!– { “request”: { “5555” : “<?=$idCustomer?>” } } –>

If a chat request is requested from website, the operator will see this hidden field of data in “Request information”


You can also use this same method to pre-fill fields in the form that are visible to the visitor. For example, if they are logged in to your website, you can pass their name, email and phone number through the same methods and when they request a chat, they will see all 3 of these fields filled out on the chat request form! Use the same method outlined above with a different type of field, such as Text Field.


New Generate HTML Area with Direct Link Launched

Written by: Categories: Features,News
March 22nd, 2011

Some of our users may have noticed an updated Generate HTML area in their account administration section.

live-chat-html-for-websites

The section can be accessed by visiting Setup –> Generate HTML

Other than the more updated look, we added 2 features that we hope will greatly improve the deployment and ease of use of our website live chat system :

1. The department select page is disabled by default for accounts with 1 department or less. It can be enabled again through a checkbox under the Options section. The ability to toggle whether chat requests require a pre-chat request form or whether the page is bypassed to go straight to chat is also available through the Options section:

Multiple Departments in Live Chat

Show Department Select Page

2. A new option is available – Direct Link using a shortened URL, http://occ.bz. The new option is designed for direct linking to your live chat account or department. We also used a short URL for easy integration into character-sensitive systems like Twitter. This new option is ideal for social networks such as Linkedin and Facebook.

Live Chat For Social Networks

Direct Link Chat Option

Check out the new Generate HTML section and expand OCC live chat support to all the social networks your company uses:

Live Chat HTML Generation

Generate HTML Section

On Hold – Changes & Improvements

Written by: Categories: Features,News
August 18th, 2010

Some of our Premium users and Free Trial users may have begun using our newest Chat On Hold feature.

We’ve made some simplifying changes and improvements to the interface of the feature within our administration section.

The On Hold settings can now be found under the Messages menu (Setup -> Settings -> Messages -> On Hold) and not under its own separate menu under Settings.

Selecting the on hold sound and on hold text is now easier than before with more easily clarifying radio buttons and explanatory text.

Chat On Hold Feature Section

Chat On Hold Feature Section

We hope you find the improvements useful and would love to hear your feedback on the new feature!

New Web Agent Features: Multi-Language Support

Written by: Categories: Uncategorized
March 8th, 2010

We’ve now added all the languages our services have been translated to to our new web agent. We’ve added some new feature titles and changed the structure of our menus, so there are still some words appearing only in English. We’ll be updating these words shortly!

The languages we support are:

– English
– Bulgarian
– Croatian
– Dutch
– Farsi
– French
– German
– Italian
– Japanese
– Polish
– Russian
– Spanish
– Swedish
– Turkish
– Vietnamese

More to come soon, hopefully! If you want to help us translate to your language or have an update to an existing language please contact us:

Contact Us

New Features & Updates: Web Agent – Geolocation, Chat Tabs, Message Notifications

Written by: Categories: Features
February 25th, 2010

A lot of new, standard features have been updated to the web agent this week:

1. An improved version of the geolocation feature; now more accurate.

2. Tabbing of chats for multiple chat sessions

3. Message notifications including a flashing tab and sound when a new message is received.

Use the new web agent at: https://www.onlinechatcenters.com/agent